Updated on April 2, 2026
Have you ever noticed solar panels on a roof and wondered what keeps them in place? Maybe you’ve researched panels, inverters, and batteries, but haven’t thought about the mounting system.
The mounting system is what keeps your solar investment secure on your roof for decades. If it’s not done right, everything above it could be at risk.
At PSC Energy, we’ve worked with all types of roofs across Australia. We understand what makes an installation reliable and what can lead to issues later on.
In this article, you’ll learn about the following:
- What is a Solar Mounting System?
- The Key Components of a Solar Mounting System
- The Mounting System Assembly and Installation Process
- Why PSC Energy Uses Schletter Solar Mounting Systems
- FAQ: Solar Mounting System
By the end of this article, you’ll find out what a solar mounting system is, its main parts, how it’s installed on tin and tile roofs, and why we prefer Schletter.
What is a Solar Mounting System?
When you see solar panels on a roof, you’re just seeing the panels. Underneath, there’s a metal framework that holds everything together. This is the solar mounting system, and it does the important job of supporting your panels.
The mounting system is what attaches your solar panels to your roof. It keeps them secure through all kinds of weather for as long as your solar system lasts. Without it, your panels wouldn’t have anything to rest on.
At PSC Energy, we focus on roof-mounted solar, which is the most popular and affordable choice for Australian homeowners. We use either a tin or tile racking kit, depending on your roof. While solar can also be installed on the ground with poles or footings, roof mounting is usually the better option for most homes because:
- It costs less than a ground mount system.
- It doesn’t take up usable space on your property.
- It uses the existing structure of your home as its foundation.
The mounting system is made up of several parts that bolt and clamp together to create a strong structure. Each part helps keep your panels steady and your roof protected from leaks. Let’s go through each one.
If you’re interested in learning more about why you should rough-in solar during construction, you might want to check out the following article titled, Why You Should Rough-In Solar During Construction.
The Key Components of a Solar Mounting System
The mounting system has five main parts. Each one does a specific job, and together they keep your panels safe and secure.
Rails
The rails are the main support of the mounting system. These long metal beams run parallel across your roof, spaced just over a metre apart.
Once in place, your solar panels are mounted directly on top. All other parts of the system either support the rails or connect to them.
Clamps
Clamps are what hold your solar panels onto the rails. There are two types:
- Mid clamps sit between two panels along the rail.
- End clamps sit at the ends of the rail, securing the outermost panels.
Without clamps, your panels wouldn’t stay in place when it gets windy.
Feet
The feet connect the rails to your roof. Each foot is an L-shaped metal piece that bolts straight into a truss under your roofing, whether it’s tin or tile. The rails attach to the feet, anchoring the whole system to your house.
Stainless Steel Screws with Rubber Washers
Every screw exposed to the weather has a rubber washer. This washer creates a watertight seal around the screw head, which is especially important for metal roofs where the screw sits on top of the sheet. It’s like a regular screw, just bigger, with a rubber ring to keep water out.
If you want to learn a bit more about the importance of roof restoration and solar, you might want to check out the following article titled, Roof Restoration and Solar Panels: Guide for Western Sydney.
The Mounting System Assembly and Installation Process
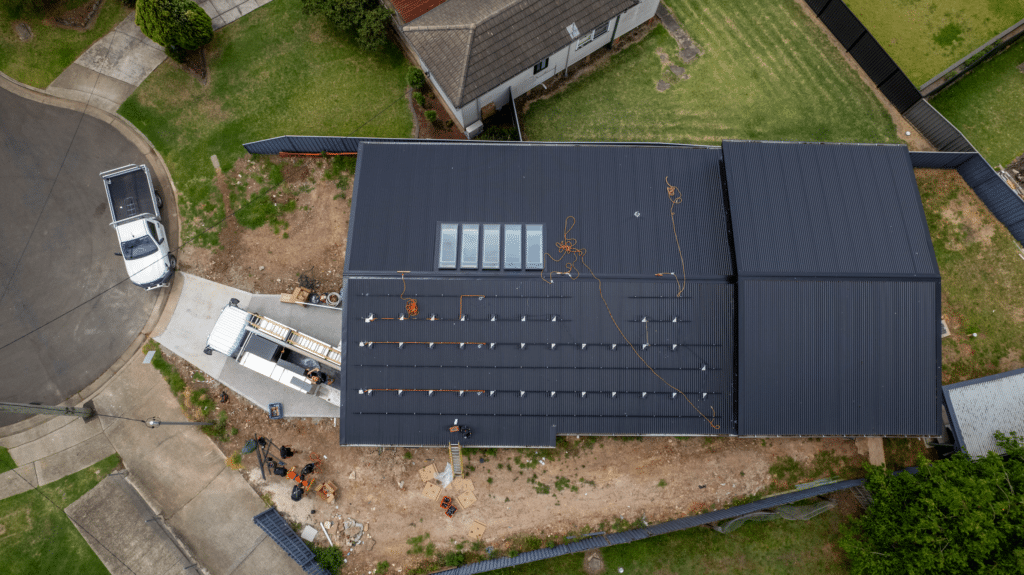
Installing a solar mounting system follows a clear set of steps. The process begins on the ground and then moves up to the roof.
Step 1: Assembling the Feet
The installation team arrives early, usually around 7am. The electrical apprentices start by putting together the feet for the racking system on the ground before anything is installed on the roof.
Step 2: Taking Measurements
Before installing any feet on the roof, the crew takes careful measurements to find the best spots for them. This step is more important than it might seem.
Every mounting system has to be at least 200mm from any roof edge. This is a building code rule, not just a suggestion. At PSC Energy, we always follow this rule, even if it means changing the design and removing a panel to stay compliant.
While measuring, the crew also finds the roof trusses. Trusses are the main timber beams under your roofing, and they’re the only place where the feet can be securely bolted. The spacing between trusses is different for each roof:
- They might sit 600mm apart, 900mm apart, or a full metre apart.
- On a tile roof, there is usually a truss under every third, fourth, or fifth tile, depending on tile width.
It’s also useful to know the difference between a truss and a batten:
- A truss is the main structural timber beam of the roof frame, like a rafter.
- A batten is a smaller beam that sits on top of the trusses. On a tin roof, the metal sheet screws into the battens. On a tile roof, the tiles rest on the battens.
The feet need to be bolted into the trusses, not just the battens, to make sure the mounting system is strong. Schletter also requires that the installation meets certain standards for the warranty to stay valid. If the system isn’t installed correctly, the Schletter engineering certificate and warranty won’t apply.
Step 3: Installing the Feet on a Tin Roof
Installing on a tin roof is usually straightforward if the roof was put in properly. After the measurements are finished:
- The installer pulls out the existing roof screw holding down the metal sheet.
- The L-shaped foot goes down over the same hole.
- A thicker gauge screw goes back through the foot into the batten below, biting deeper for a stronger hold.
Installers follow the existing roof screw lines to guide foot placement, making the process more efficient on a well-installed tin roof.
Step 4: Installing the Feet on a Tile Roof
A tile roof needs extra care. The installer lifts each tile to find the trusses underneath. After finding a truss, they grind down the underside of the tile that will sit over it.
The foot bolts to the truss with two screws, so it sits above of the truss surface by a few millimetres. If you slide the tile back over the foot without grinding it down first:
- The tile sits up on the foot and leaves a gap of 10 to 15mm.
- The full weight of the tile rests on the foot, creating a pressure point.
- Over 5, 10, or 15 years, that pressure point will most likely crack the tile.
- That crack is when the leak starts.
Grinding the tile removes the pressure point and lets the tile sit flat. This small step helps protect your roof for many years.
Step 5: Attaching the Rails
Once the feet are installed, the next steps are the same for both tin and tile roofs. The 4.4-metre rails attach to the feet. The feet can be adjusted up or down by about 30mm, so the installer can fine-tune the rail height.
After the rails are connected, the crew runs a string line from corner to corner and top to bottom to level the whole racking system. Even if the roof isn’t perfectly flat, the racking can usually be adjusted to look clean and professional.
Step 6: Mounting the Panels and Managing Cables
Once the rails are level, the panels are mounted onto the racking, and the cables are attached to the rail. The solar panels are held in place with mid-clamps between panels and end-clamps at the ends.
An earthing washer is placed between each panel and the rail to make sure the whole array is properly earthed. The team tests each panel from the ground up to confirm earth continuity.
Cable management is an important part of a quality installation. The DC cables run along the racking system and need to be secured to prevent sagging or contact with the roof surface.
The rule is that more than 50% of your cable support must use permanent fixings. Nylon cable ties alone don’t meet this requirement because they degrade over time. A good nylon tie might last 15 years, while a poor one might last only 5.
At PSC Energy, we secure cables using a combination of:
- Stainless steel clips attached to the rail or panels to hold the cable up off the roof surface.
- One nylon tie per panel to pin and set the cable position.
- Two nylon-coated stainless steel ties per panel on top to meet the permanent fixing requirement.
This method keeps the cables neat, secure, and able to last as long as the system does.
Step 7: Bringing Cables Through the Roof
Where cables need to pass through the roof, the installer cuts a 28mm hole. That hole gets sealed with Sikaflex, and a Dektite goes over the top as a second layer of protection:
- On a tin roof, a smaller tin dektite, similar to a flashing, covers the penetration.
- On a tile roof, a larger dektite with a lead flashing attaches over the hole to prevent water ingress.
This two-step sealing process makes sure the spot where the cable goes through the roof won’t leak.
If you’re interested in learning a bit more about planning solar for a new build, you might want to check out the following article titled, Questions to Ask Your Builder Before They Install Solar on Your Roof.
Why PSC Energy Uses Schletter Solar Mounting Systems
Schletter is our preferred mounting system brand, and the reasons go well beyond personal preference. Here’s what sets them apart.
Warranty
Schletter offers a 25-year warranty on their product. Most other brands only offer 10 to 15 years. That extra coverage is more important than you might think.
Your solar panels also have a 25-year warranty. The mounting system should last just as long.
- If the racking fails before the panels, the whole system is at risk.
- If the racking rusts and a storm hits, the panels could come down.
Having a mounting system with a matching warranty helps avoid that risk.
Engineering Support
Not every roof is straightforward. When PSC Energy encounters a tricky or non-standard roof, Schletter sends out a team of engineers to design a custom solution and work through it with us. That level of support is not something you get from every racking brand.
Material and Build Quality
Schletter makes its racking systems from aluminium. Here’s why that’s important:
- Aluminium is lightweight, which reduces the load on your roof structure.
- It resists corrosion, which is critical for a product that lives outdoors for 25 years.
- It holds up in extreme conditions, from the heat of the Sahara Desert to sub-zero temperatures in the Canadian Arctic.
All-Black Anodised Finish
This is one of our favourite features of Schletter racking. The rails are anodised black to 20 microns. That anodised coating protects the aluminium from the elements far better than the raw silver finish you’ll find on cheaper racking systems.
The difference between black anodised racking and plain aluminium is similar to the difference between Invisalign and braces. Both work well, but Invisalign is more discreet and looks better.
Schletter’s black anodised racking with all-black panels gives your roof a clean, modern look that plain aluminium can’t match.
Global Reputation
Schletter is a top racking brand around the world, known for its commitment to sustainability and renewable energy. Choosing a product from a global manufacturer with this kind of experience means you’re picking a brand that has worked in every climate and roof type.
If you’re interested in learning a bit more about the importance of a good installer for your solar (the most important component of any system, seriously), you might want to check out the following article titled, In-house Installers vs. Subcontractors: Which is Better?
Wrapping Up: Now You’re on the Right (rail) Track
You may have started this article knowing little about solar mounting systems. Now you have a clear understanding of what they are, how they work, and what makes a quality installation last.
Use what you’ve learned here to ask better questions when you talk to your installer, whomever they might be. A good installer will be happy to answer. If they can’t, that’s a sign to pay attention to.
At PSC Energy, we install quality racking with every solar panel system we install. It’s what we do.
If you’re interested in learning a bit more about the importance of your roof type and how it affects your solar installation, you might want to check out the following article titled, How Does Your Roof Affect Your Installation?
FAQ: Solar Mounting System
What is a solar module mounting system?
A solar module mounting system is the metal framework that attaches your solar panels to your roof. It holds your panels securely in place through wind, heat, and rain for the life of your solar system.
It’s made up of rails, clamps, feet, and stainless steel screws with rubber washers.
What is included in a solar panel mount kit?
A standard solar panel mount kit includes rails, mid-clamps, end-clamps, feet, and stainless steel screws with rubber washers. Each part plays a specific role in keeping your panels stable and your roof weatherproof. PSC Energy uses a general tin or tile racking kit, depending on your roof type.
What is the difference between a mid clamp and an end clamp?
Mid clamps sit between two solar panels along the rail and secure the panels on both sides. End clamps sit at the ends of the rail and secure the outermost panels on one side.
Both are critical parts of the installation and help prevent your panels from lifting in high-wind conditions.
Does a solar panel mounting system affect building codes?
Yes. Australian building codes require that the entire solar mounting system be at least 200mm from any roof edge. The mounting system must also be installed in accordance with the manufacturer’s specifications to maintain the validity of the engineering certificate. If those specs aren’t met, the warranty is void.
Can you install roof mounting on a tile roof?
Yes, but a tile roof requires more care than a tin roof. The installer lifts individual tiles to locate the roof trusses, then grinds down the underside of tiles that sit over the feet. This step prevents the tile from sitting up on the foot and creating a pressure point that can crack the tile and cause a leak years down the track.
How does wind load affect a solar panel mounting system?
Wind load is the force that wind places on your solar panels and racking system. A quality mounting system like Schletter is engineered to withstand extreme weather conditions anywhere in the world. The mid- and end-clamps secure the panels to the rails, and the feet bolt the entire system to the roof’s structural trusses, providing the array with the strength to withstand high-wind events.
What is the best solar panel mounting system for Australian homes?
The best solar panel mounting system is one that matches the 25-year lifespan of your solar panels, meets Australian building codes, and is backed by solid engineering support.
PSC Energy uses Schletter racking systems because they carry a 25-year warranty, are built from corrosion-resistant anodised aluminium, and come with manufacturer engineering support for non-standard roofs.